
If you're building a brand, promoting services, or launching a side hustle, a Facebook Business Page is one of the best free tools to connect with your audience. Here's how to set one up from scratch in just a few minutes.
✅ Step 1: Log In to Facebook
Go to facebook.com and log in using your personal Facebook account. Don’t worry—your personal profile won’t be visible on the business page.
🛠️ Step 2: Start Creating Your Page
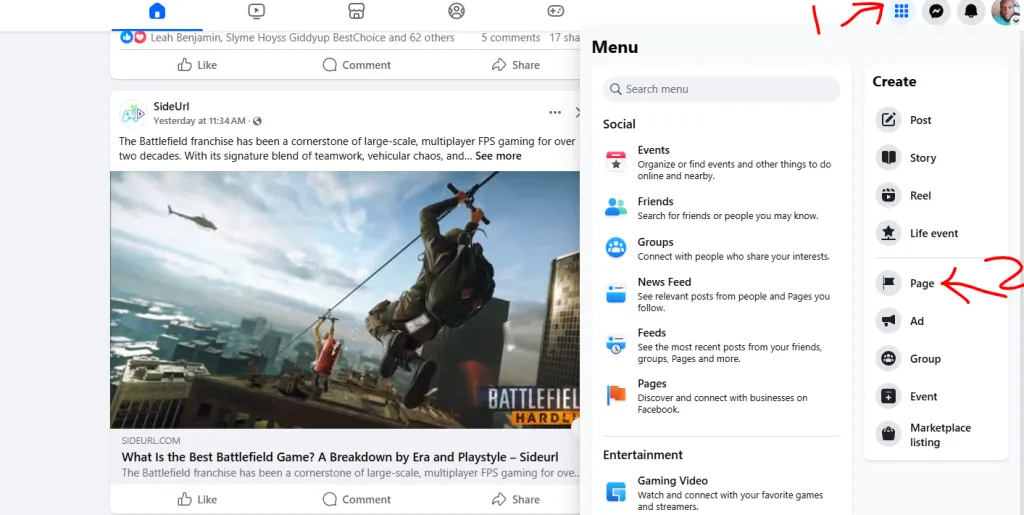
Click the Menu button (grid icon) in the top right corner, then select Pages.
Next, click “Create New Page.”
📄 Step 3: Fill in Basic Info
Enter the following:
- Page Name – Use your brand or business name.
- Category – Type keywords like “Restaurant,” “Clothing Store,” “Marketing Agency,” etc., and choose the most relevant option.
- Description – Write a short paragraph about what your business does (maximum 255 characters).
Click “Create Page” when you’re ready.
🎨 Step 4: Add Images
Upload a profile picture – typically your logo or a professional headshot.
Then add a cover photo – this should be eye-catching and represent your brand’s vibe.
You can skip this and add images later if needed.
📍 Step 5: Add Contact Details and Location
Enter your:
- Website URL (if you have one)
- Business phone number
- Physical address (optional)
This helps customers reach you easily and boosts your credibility.
⚙️ Step 6: Customize Your Page Settings
Under the Settings tab, you can:
- Adjust who can see and comment on your page
- Connect your Instagram account
- Set up messaging options (like auto-replies)
You can also assign other people as admins, editors, or moderators if you have a team.
📢 Step 7: Publish Your Page
Once everything looks good, click “Publish” to make your page live.
Now you're ready to start posting, sharing updates, running ads, and growing your online presence!
💡 Bonus Tips for Growing Your Page
- Post regularly with engaging photos, videos, or stories
- Use hashtags and tag locations to reach more users
- Invite your Facebook friends to like the page
- Run a small ad campaign to attract your first followers
- Add a call-to-action button like “Book Now” or “Shop Now”


Sign in to join the conversation.
Sign in with Google